A little blues after 7 years of blues
Leave a reply
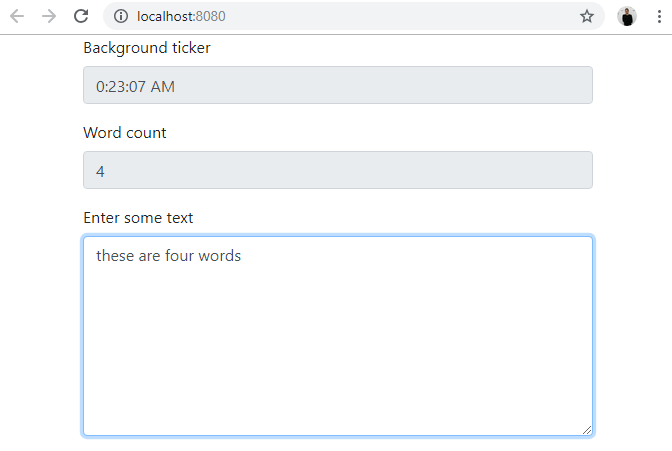
This is the next post in the reactive examples series. Previous articles focused on building a MVVM-style ReactiveUI-based Windows application in C# with the help of Reactive Extensions. The example application had some simple word counting logic and a background ticker, demonstrating an implementation without using error-prone callbacks or explicit threading. This article will try to re-create the same application for the web browser using Vue.js, Bootstrap-Vue and vue-rx.
The result looks like this:
After several attempts to implement the example with RxJavaFX, I gave up on RxJava for a UI, and focused on another approach to writing concurrent reactive software: the Actor Model. This lead me to converge on two* Actor Model languages, Pony and Elixir/Erlang, and later, on one framework: Vlingo (thanks to a serendipitous meeting and a kind invitation to an IDDD workshop by Vaughn Vernon).
The venture resulted in several presentations, including one at the Lightweight Java User Group München Meetup. In the preparation for the meetup, I have demonstrated how Reactive Extensions can enhance actor model code with time-based operators, and how the transition between the paradigms is achieved (see vlingo_experiments/batching_with_rx).
As late Pieter Hintjens said and wrote, alluding to Conway’s Law, “read about the Actor model, and become a message-driven, zero shared state Actor”. The 1973 paper by Carl Hewitt and others on the Actor Model was published in proceedings of an artificial intelligence conference of the time. There are good indications that this concurrency model is a good fit for a computational model of the brain (see 1, 2).
All this deserves another series of blog posts.
The Actor Model is coming to the browser too: it is a natural fit for the modern web. See the talk: Architecting Web Apps – Lights, Camera, Action! (Chrome Dev Summit 2018) and the related Github project: PolymerLabs/actor-boilerplate. It has been seen in other places too, such as in the emerging framework Tarant.
Alas, I can’t show an actor model example in the browser, yet. Thus, back to Reactive Extensions!
It seems, in the world of web front-end programming, there are numerous diverging paths, all of which, in the end, converge on downloading half the internet of little script files in various dialects of JavaScript. But don’t despair, commit often and small. I am not native to the JS world, and previous attempts to re-create the example in the browser failed miserably.
The path chosen here is to start with a boilerplate generated with Vue CLI 3.
vue create vue-rx-example
Install the dependencies via npm install:
Replacing the generated view boilerplate, the following remains:
<template>
  <b-form>
    <b-form-group label="Background ticker">
      <b-form-input readonly type="text" v-model="ticker" />
    </b-form-group>

    <b-form-group label="Word count">
      <b-form-input readonly type="text" v-model="countWords" />
    </b-form-group>

    <b-form-group label="Enter some text">
      <b-form-textarea v-model="text" style="min-height: 200px" />
    </b-form-group>
  </b-form>
</template>
which is a simple form with two read-only text fields, and one input text area, all declaratively bound to the viewmodel via the v-model directive
The dependencies must be registered with Vue in the <script /> tag in order for them to work together as intended (excluding some CSS/other boilerplate):
import Vue from "vue";
import VueRx from "vue-rx";
import Rx from "rxjs/Rx";
import BootstrapVue from "bootstrap-vue";
Vue.use(BootstrapVue, VueRx, Rx);
// here comes the ViewModel
The following is all of the ViewModel with the explanations in the comments:
export default {
  name: "HelloWorld",
  data() {
    // input field is bound to this
    return {
      text: ""
    };
  },

  // rx-vue part
  subscriptions: function() {
    // watch the input data as an observable stream
    const countWords = this.$watchAsObservable("text")
      // update only if not typing for 1/2 s
      .debounceTime(500)
      .pluck("newValue")
      .startWith("")
      // count the words
      .map(val => {
        const s = val.trim();
        return s == "" ? 0 : s.split(/\s+/).length;
      });

    // tick the timestamp every second
    const ticker = Observable.interval(1000 /* ms */).map(_ =>
      new moment().format("H:mm:ss A")
    );

    return { countWords, ticker };
  }
};
which a Rx.Net developer might find familiar:
this.WhenAnyValue(x => x.TextInput)
    .Where(x => !string.IsNullOrWhiteSpace(x))
    .Select(x => x
        .Split()
        .Count(word => !string.IsNullOrWhiteSpace(word)))
    .ToProperty(this, vm => vm.WordCount, out _WordCount)
;

Observable
    .Interval(TimeSpan.FromSeconds(1))
    .Select(_ => DateTime.Now.ToLongTimeString());
    .ToProperty(this,
        ticker => ticker.BackgroundTicker,
        out _BackgroundTicker)
;
Reactive Extensions have proven to be a suitable paradigm for building reactive user interfaces, landing them on the Thoughtworks Radar into the Adopt ring. Rx implementations can be used in variety of technologies, as the Reactive Trader project has shown.
While the Actor Model shines on the server, reactive, message-driven technologies play well together, and, perhaps, soon it will be natural to structure applications as a mix of stream-based and actor-based components.
Source code: https://github.com/d-led/vue-rx-example
Demo: https://ledentsov.de/static/vue-rx-example
Today’s software is often connected, be it for automatic desktop updates or for implementing an internet-scale service. Developers’ tools or toys are no longer solely editors or compilers, but also databases, logging or search services, code sharing platforms, or Continuous Integration servers. Evaluating distributed on-premise software has not been as easy as desktop software, however. Arduous and error-prone installation instructions seem out of place, but are still very common. A number of open source software now comes with a one(or two)-liner installation that is always up to date. GoCD is one of them.
While discovering features of GoCD I sometimes wished for even more simplicity and automation: a one-liner for a whole Continuous Integration environment. This should include a server, several build agents, and several source repositories. With a recent push towards containerized software delivery, the path is quite clear: build, provision and configure the whole infrastructure from code and run it in containers. This way, it is easier to experiment, build and communicate Continuous Delivery prototypes.
06.09.2017: GoCD is undergoing rapid evolution, which means the details presented in this blog post may change. The GitHub repository contains the version-specific configuration in detail that is known to work.
There are official GoCD Docker images for both the server and base images for the build agents. The containers are configured such that the build agents can register themselves automatically with the server if the auto-registration key of the server is known.
Thus, starting from the official Docker images, to get to a one-liner self-contained infrastructure installation, the following ingredients are missing:
Docker Compose is a tool to define and run multi-container applications. It is so pragmatic that using it almost feels like playing.
To start the server and an agent, the following Docker Compose configuration would suffice:
go-server:
  image: gocd/gocd-server:v17.9.0
  ports:
    - '8153:8153'
    - '8154:8154'

goagent:
  image: gocd/gocd-agent-alpine-3.5:v17.9.0
  links:
    - go-server
  environment:
    GO_SERVER_URL: https://go-server:8154/go
Running docker-compose up -d pulls and brings up the minimal infrastructure.
In the configuration above, the agent is rather empty, and probably does not contain the build infrastructure we need.
Here, we extend the gocd/gocd-agent-ubuntu-16.04:v17.9.0 image, installing some Lua infrastructure:
FROM gocd/gocd-agent-ubuntu-16.04:v17.9.0

RUN apt-get update && apt-get install -y --force-yes \
    luarocks \
    ca-certificates-java
RUN update-ca-certificates -f
RUN luarocks install busted
In the docker-compose configuration, the image tag is replaced with a build one:
  goagent_lua:
    build:
      context: .
      dockerfile: Dockerfile.lua-agent
    links:
      - go-server
    environment:
      AGENT_AUTO_REGISTER_KEY: '123456789abcdef'
      AGENT_AUTO_REGISTER_RESOURCES: 'gradle,java,lua'
      GO_SERVER_URL: https://go-server:8154/go
Note the resources that can be assigned to the build agents from the docker-compose file and get passed to the agent container as environment variable for correct automatic registration with the server.
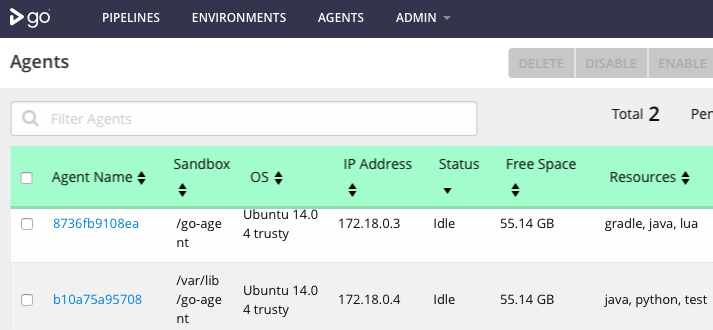
After bringing up the infrastructure and the auto-registration key matches that of the server, the agents are registered with the server:
25.3.2017 Update: in the GoCD 17.3.0 server image, the auto-registration key is a generated one, and is not set to the default above. To enable auto-registration, the provisioning step is used.
The final missing piece of the self-provisioning CD infrastructure is the addition of the repositories to be built. There is a number of GoCD management libraries on Github. Each would probably serve the purpose of setting up the pipelines.
The approach taken here is to centrally manage a list of repositories to be built, while delegating the details of each pipeline to the corresponding repository. This way, the pipeline configuration is part of the repository itself (pipeline as code), and could be portable between different GoCD instances.
The three ingredients are: the pipeline configuration from source control feature #1133, the YAML Config Plugin, and the GoCD REST API, as of the time of the experiment, none of the tools I have seen could add the pipeline-as-code configuration.
Update 10.08.2017: as of GoCD v17.8 the YAML Config plugin is bundled with the server
Update 06.09.2017: as of GoCD v17.9 the plugin identification tag is now pluginId
for a simpler provisioning via mapping (or copying) a config file into the container, see the next chapter
To configure the server with the pipelines, and set the auto-registration key, a separate container runs a Python script once. This way, provisioning is decoupled from the generic server configuration and can be replaced by another mechanism without rebuilding the server image. The script provisions the server with the pipelines, and sets the auto-registration key to the one agreed upon.
A common problem is the startup sequence of the containers. Trying to provision the server before it is ready to accept configuration would result in an error. Thus, the provisioning script tries to avoid pushing the configuration too early by waiting for the GoCD web UI to become available. This is accomplished by waiting using urlwait:
if not wait_for_url("http://go-server:8153", 300):
  print("""Go server did not start in a timely fashion.
           Please retry docker-compose up provisioner""")
  sys.exit()
The repositories to configure pipelines from are (here, rather crudely) added directly to the XML config as the yaml config plugin expects them. The XML is first read from the /go/api/admin/config.xml API, then simply extended with the necessary tags, and then posted to the same URL. There is still a chance of a race condition that the configuration is changed between it is read and it is written. As GoCD validates the config upon modification, and the script strives to be idempotent, re-running the container should fix the conflict.
The GoCD XML config needs the following addition for a repository to configure a pipeline:
<config-repos>
 <config-repo pluginId="yaml.config.plugin" id="gocd-rpi-unicorn-hat-monitor">
  <git url="https://github.com/d-led/gocd-rpi-unicorn-hat-monitor.git" />
 </config-repo>
</config-repos>
In the repository itself, place a ci.gocd.yaml with a corresponding pipeline definition.
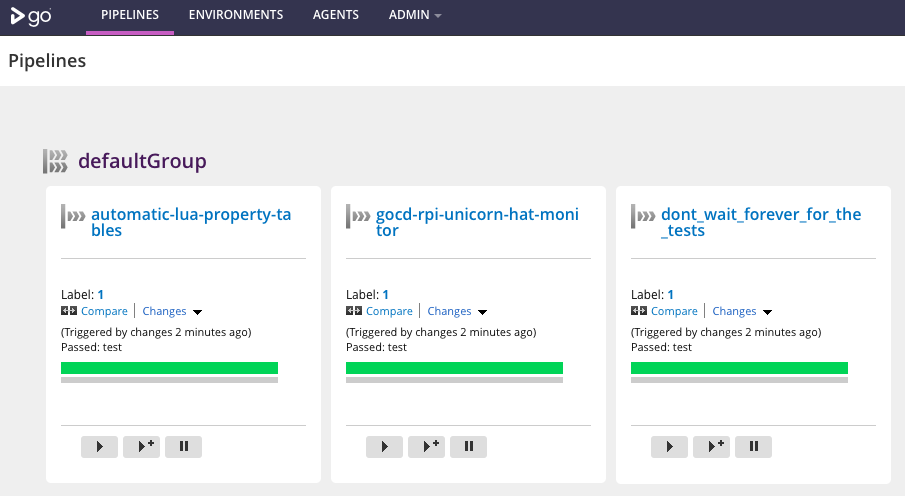
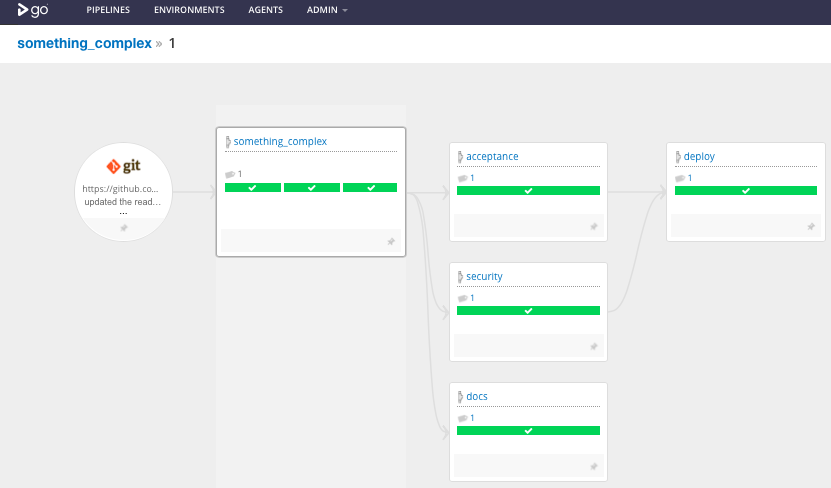
After grabbing a coffee, the infrastructure has been started, provisioned and configured, and the UI shows the result:
With the current official Docker image for the server, it is possible to map (or copy) configuration-relevant files and folders into the container. In our case this means, the plugin, and the whole server configuration can be directly mapped into the container, thus, provisioning the server without an extra provisioning step.
As GoCD keeps the pipeline configuration in a single file cruise-config.xml, we can simply track it in the same repository as the Docker Compose config. To map the configuration, and the plugin jar, the volumes are added to the container config:
  go-server:
    image: gocd/gocd-server:v17.9.0
    volumes:
      - ./server_home/config/cruise-config.xml:/godata/config/cruise-config.xml
Update 10.8.2017: for the demo portability reasons the configuration is copied into the container.
When the server starts, it already has most of its configuration. As the agent auto-registration key is part of the XML config, the agents will automatically register themselves, since they are configured with the same key.
Update: 10.8.2017
The gomatic project has been updated to support GoCD v17.7. A somewhat more complex workflow configured via a gomatic script can be seen in the dedicated folder of the project.
To provision the server started with docker-compose up -d, after the server has started, make sure gomatic 0.5.0+ is installed (sudo pip install gomatic), and run python configure.py.
When the jobs have run, the following can be seen:
A comparable exercise can be performed with almost any tool. Some tools that are natively based on the concept of pipelines are Concourse CI and Drone that both use Docker as build agents (runners). Drone even comes with its own Docker-Compose config. Concourse can be bootstrapped via Vagrant.
A significant difference of GoCD to the more recent tools is its platform-independence. Sometimes, building inside a container is not a choice, e.g. on Windows. GoCD agents can run anywhere, where a JRE8 can run, thus, increasing its reach. A phoenix environment including Windows agents can be achieved with some effort using Chocolatey → Packer → Terraform/Vagrant.
This article has described an experiment to rather quickly arrive at a self-contained and self-provisioned Continuous Delivery infrastructure consisting of “Phoenix Servers” – a phoenix infrastructure.
While the result is rather humble, it demonstrates that continuous delivery techniques can be applied to a continuous delivery infrastructure itself. Using Docker Compose allowed to prototype a distributed development-supporting application and its configuration on a local developer machine with a potential to transfer the prototype into real use.
All this would be impossible without a huge network, or, I’d say, a universe, consisting of online services running and providing open source software that is created by a large number of open source communities, and a yet larger number of individuals collaborating in various ways to envision, create, maintain, and run it. Moreover, times are such that one can experience successful transition of proprietary software into open source (GoCD), and companies, building business around open source software. The OSS ecosystem is a distributed, self-directing system that catalyzes idea creation, mutation and destruction much faster that most smaller systems can do. For the moment, I hope, there is no going back.
The Github repository to run the self-contained infrastructure can be found here: gocd_docker_compose_example.
The repository can be used to bootstrap demos, further experiments and proofs of concept.
This post, as any other post on my blog, is not advertisement, and no affiliation or endorsement exists. It is a write-up of my personal experiments, experiences and opinions. The results obtained here can most certainly be achieved using other tools and technologies.